To start a sketchbook, choose a book you are comfortable using, test one drawing tool, and give the first spread a small job. Draw an everyday object, add one observation, and leave a clear idea for your next visit. You do not need a finished illustration or a personal art style before making the first mark.
This guide is for adult beginners who want to draw from ordinary life. The worked example uses a teaspoon and tea bag wrapper across three short passes. The result is a page you can learn from, rather than a performance you need to share.
Key Takeaways
- Give the book a practical purpose before choosing a difficult subject.
- Test your tool on the actual paper.
- Use three passes: placement, observation, and one revision.
- Keep a next-page idea beside your latest sketch.
What should your first sketchbook be for?
Choose one main use for the opening week: noticing shapes, recording everyday objects, testing materials, or developing ideas. These can coexist later. A narrow starting purpose simply makes tonight’s decision easier. If your intention is observation, a rough drawing with a useful note has done its job.
Separate a practice book from a portfolio in your expectations. A portfolio selects work for an audience; a sketchbook can contain questions, failed trials, and unfinished studies. Illustrator Julia Bausenhardt’s advice on starting a sketchbook makes that distinction explicit. You can keep the book private while you find out what helps you draw.
Write a working instruction inside the cover, such as: I will use these pages to notice shapes I usually overlook. This is a task description, not a motivational slogan. When you cannot decide what belongs on a page, return to that instruction and choose something observable.
Our screen-free hobby guide offers other ways to make room for creative time. For this activity, leave the scrolling inspiration feed closed and place one real object beside the book.
Which materials are enough to begin?
Start with the sketchbook you already own, one graphite pencil, and an eraser if you use one. Put the book on a stable surface with light that lets you see both page and subject. A large collection of pencils is unnecessary for discovering whether you enjoy this way of working.
Make a small test near the back: draw a light line, a darker line, and a shaded patch. Notice whether the pencil catches on texture and whether rubbing smears the graphite. That gives you information about this particular paper instead of sending you shopping for a supposedly perfect setup.
| Starting tool | A useful first test | Decision to make |
|---|---|---|
| Graphite pencil | Light outline and a small dark patch | Can you vary the mark comfortably? |
| Fineliner | A few lines on a back page | Does ink show through or feather? |
| Wet color | A small test on suitable paper | Does the paper tolerate the water you use? |
Use the test to choose the medium, rather than forcing a page to handle material it does not suit. Makings and Musings’ beginner guide also starts with a small tool set. Its advice is a starting approach, not a rule that forbids color until you reach some level.
Keep the first session simple enough that setup and cleanup do not consume your available time. Add a new material when you have a specific reason to test it.
What can you draw on the first page?
Choose something nearby with a clear outline and a manageable number of parts. A teaspoon, folded wrapper, plain shoe, or small kitchen tool gives you enough to observe without requiring an entire room. Pick an object that can remain in place while you draw.
Do not confuse ordinary with easy. A spoon has reflections and curved edges that can become complicated. For a first page, decide which problem you will study: the overall silhouette, the relationship of bowl to handle, or the shadow underneath. You can leave the others for another day.
Adobe’s sketchbook prompt collection shows how widely subjects can vary. Treat a prompt as a way to choose a task, then reduce its scope to fit your session. A single corner of a patterned cloth may be more useful tonight than drawing every fold.
If page one feels unusually important, begin on another page. You can return to the opening later. The book does not require a ceremonial introduction, a title illustration, or a complete page before it becomes usable.
How do you complete a first spread in three passes?
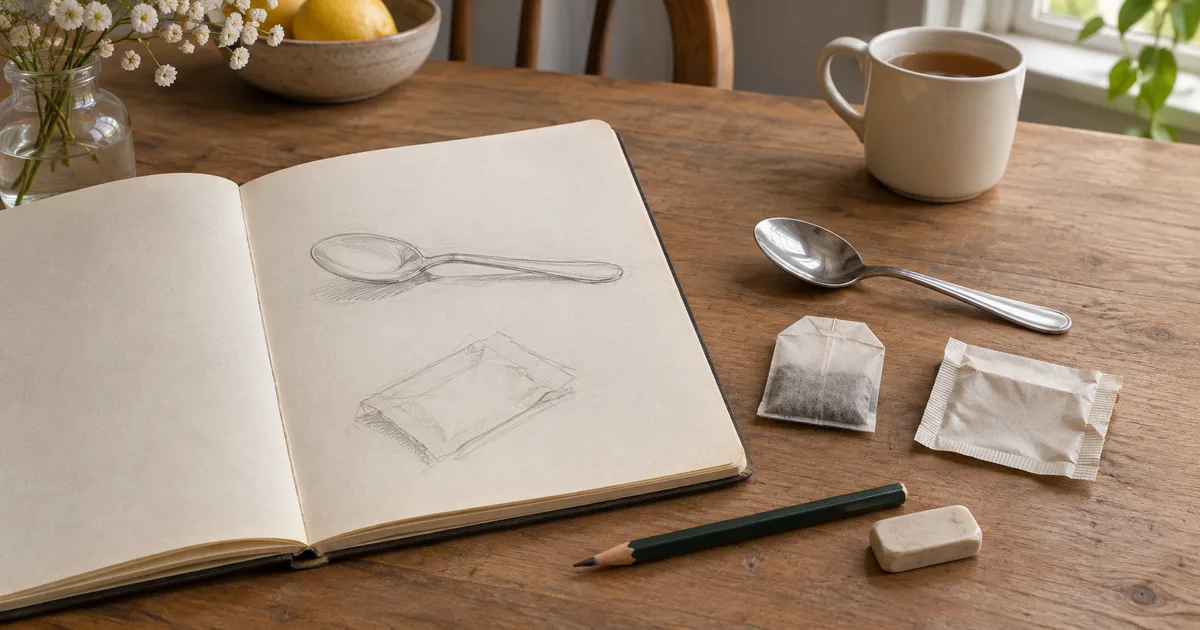
Try this original exercise with a teaspoon and a folded tea bag wrapper. Place both on a plain surface, leaving a little space between them. Allow roughly fifteen minutes, or divide the passes across separate visits. The timing is a convenient boundary, not a test of speed.
Pass one: place the two objects
Use the left page for small, light outlines. First mark how much page width the pair will occupy. Indicate the spoon’s direction and the wrapper’s rough rectangle before adding edges. Leave space beside them for a second attempt; you are not committing the whole spread to one drawing.
Pass two: compare before adding detail
Look back and forth between the objects and your marks. Is the spoon bowl too wide relative to its handle? Does the wrapper lean in the same direction as the real one? Choose one mismatch. If proportion is the sticking point, our negative-space exercise offers a way to inspect the gaps around objects.
Pass three: revise one decision
Suppose your spoon looks squat. Instead of erasing everything, draw a second small version on the right page with a longer handle. Compare both with the object. Add a note: the first handle was too short; compare its length before drawing the bowl. The expected result is a clearer proportion decision, not a polished silver surface.
Finish by circling the version that explains your observation best. Keep the wrapper simple. This gives the spread a visible sequence: first attempt, specific correction, and next action. You can understand what happened when you reopen it a week later.
What should you do with awkward or unfinished pages?
Keep a mistake when it records a useful decision. A corrected contour can show what you initially assumed and what observation changed. If you erase every unsuccessful mark immediately, you may remove the comparison that would help your next attempt.
An unfinished page also needs context. Add a short note about what stopped you: light changed, object moved, or too much detail too soon. Those are different problems with different solutions. A later session can stabilize the setup, choose a new subject, or reduce the drawing to its main shapes.
Try a small new study beside the old one rather than repeatedly repairing the same drawing. When you want more focused technique work, Become a Pro Pencil Drawing Artist is a related BestDigiBooks guide. Use a relevant exercise, then return to your own subject.
Do not turn every page into a critique sheet. One clear observation is enough. Some sessions can be exploratory marks with no correction at all, especially when you are testing how a tool behaves.
How can you plan the next week without a demanding challenge?
Choose three possible entries, not a promise to fill seven perfect pages. For example, revisit the spoon from another angle, draw a folded cloth edge, and sketch a leaf silhouette. Keep each prompt visible inside the book so the next session starts with a decision already made.
Attach drawing to an available moment rather than an ideal schedule. You might use ten minutes after clearing the table twice this week. If the moment disappears, choose the next workable slot. There is no need to compensate by attempting several pages at once.
At the end of the week, compare the tasks you actually enjoyed. Did real objects hold your attention better than invented scenes? Was a smaller drawing easier to assess? Let those answers shape the next entries. The book becomes personal through repeated choices, not through matching someone else’s finished spreads.
Conclusion
Open the book, test your pencil, and place two ordinary objects on the table. Make one attempt, compare a specific proportion, and draw a revised version beside it. Before closing the book, name the next small thing you want to notice.
Frequently Asked Questions
Do I need to draw every day?
No. Choose a frequency that leaves room for focused observation and fits your week. Two sessions you can return to may suit you better than a daily challenge you resent. Judge the arrangement by whether you actually open the book and have a workable task, then adjust it.
Can I use photographs instead of real objects?
Yes. Use your own photographs or images you have permission to work from, especially if you plan to share the result. A photograph keeps the viewpoint still, but it also makes lighting and depth decisions for you. Label the source and alternate with direct observation when that suits your goals.